As previously announced, USM Appliance will be placed on a new
sales hold effective January
1st, 2022.
What does that mean for me?
All net new
sales of USM Appliance to new customers will be discontinued. Any new USM
Appliance orders placed until December 31st, 2021 will be accepted. Renewals
and expansions to existing deployments will continue to be accepted until
December 31st, 2023. A sales hold is NOT a declaration of any end of support;
AT&T will continue to provide support through December 31st, 2024
How can I continue to support my customers?
AT&T Cybersecurity is committed to providing our customers
with innovative security solutions. USM
Anywhere, our SaaS-based
solution, will continue to be the focus and flagship product for our Threat
Detection and Response offerings.
Over the weekend, AT&T put an official announcement out to all partners what we have been informed weeks earlier, that the Alienvault Appliance has now got an expiry date in terms of its life. Since we picked up Alienvault six years ago, dealing with the small support team out from Spain and sales team from Cork, Ireland, it has been a good ride and we’ve learnt massively a lot through the years. AT&T is steering into a different direction, and Alienvault is moving completely into cloud, putting an end to the ever popular All-in-Ones and Standard Appliance. We will miss the days of writing plugins for our clients.
Anyway, here is our official announcement:
27th September 2021
Alienvault USM Appliance End of Sales (EOS) and End of Life (EOL) Announcement
There has been an official
announcement from AT&T to all channel partners dated 25th
September 2021, that the Alienvault USM Appliance will be placed on a new sales
hold effective January 1, 2022. AT&T will also no longer support the USM
Appliance effective January 1, 2025. These dates are effectively the End of
Sales (EOS) and End of Life (EOL) dates for the USM Appliance (otherwise known
as Alienvault On-Premise). If your solution is an “All-in-One”, “USM Standard”
or “USM Enterprise”, these solutions will be the ones affected by this
announcement.
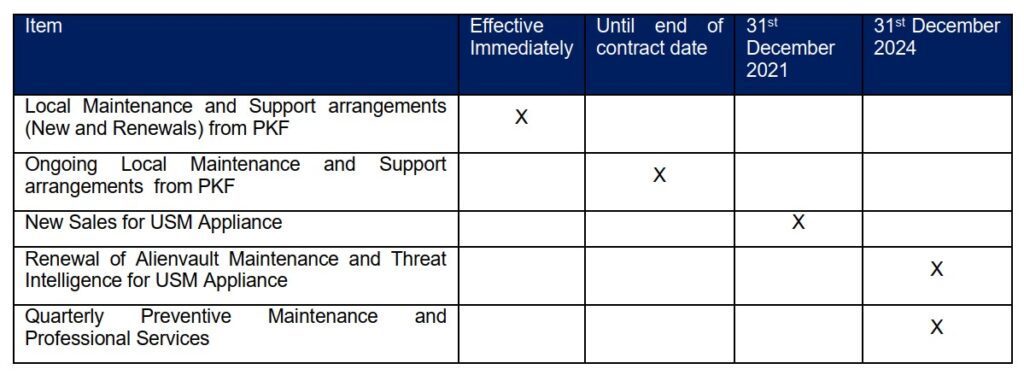
As one of the first partners of Alienvault in Malaysia since 2015, we are saddened with the news that the popular USM Appliance solution will no longer be available from 2022 onwards. We therefore require any new sales made (either from us or from our partners) from now till 31st December 2021 to inform the potential customer of the above EOL and EOS dates to ensure that purchases are made with this information clearly stated. This is to avoid any miscommunication of expectations to the end-user. Additionally, we will cease all local maintenance support renewal from the date of this letter. The local maintenance support includes arrangements for 24×7, or 8×5 call or onsite support from PKF directly. We will continue to honour all ongoing contracts until the contract expiry. This is in line with us re-allocating our technical resources and focus to other solutions and initiatives. The annual maintenance support and threat intelligence subscription from AT&T will still be continued until 31st December 2024. PKF will still be continuing our quarterly preventive maintenance or any ad-hoc professional service to assist our clients on USM Appliance matters. In summary, the cease dates are as follows:
As we move our focus away
from the USM Appliance in both sales and support, we would recommend a
transition plan to be in place. This can include the option to move to USM
Anywhere, which is the direct transition to AT&T’s SaaS based SIEM. Please
contact us at alienvault@pkfmalaysia.com for further
details in moving forward.
Thank you for your support
all these years and we hope that we can continue to work together for many
years to come.
When we started out with Alienvault years ago, they were just a smallish, start up company and we worked directly almost with the engineers and sales team in Cork. Of course, a lot has changed since AT&T took over, but during the early days, there were a lot of knowledge and mindshare done directly between us and them. So much so that if you were to check their partner site, they still list us as the only Malaysian company as their reseller, due to the early days of listing. What attracted us to the product was that we could lift the hood and see what was underneath. Alienvault (or OSSIM) was previously a hodgepodge of many working parts that were glued together and somehow made to work. The agent was a product called OSSEC, which is an open-source HIDS. The IDS is Suricata/Snort and if you look closely at the availability tool, you would see the backend is a Nagios running. NFSen is used for their netflow data display, and PRADS for their asset discovery. OPENVAS is their vulnerability scanner and best of all, they allow you to jailbreak the system and go into the OS itself and do what you need to do. In fact, most of the time, we are more comfortable on the command line than through the actual UI itself.
The history aside, the downside of adding in these different applications and getting them all to play nice together, is that you would have to understand the interworkings of these pieces.
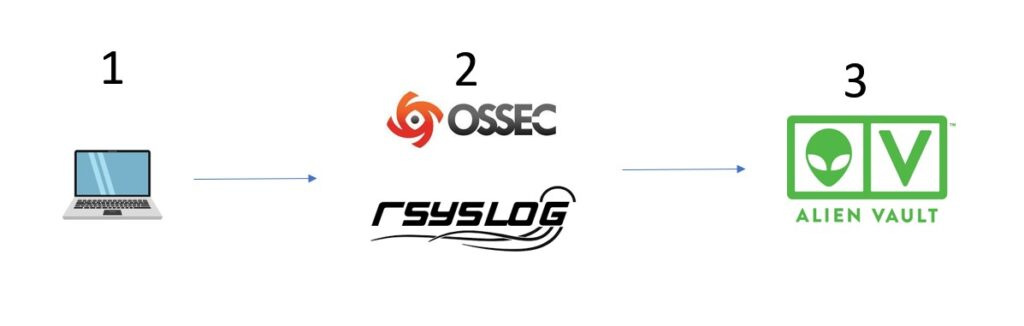
For instance, if you were to send logs via Syslog to Alienvault, you would have to know that the daemon rsyslog (not an Alienvault product) is the one being used to receive these logs. If you were to use the agent, then the application receiving these logs is different – it’s the OSSEC server that receives it. So it depends how logs come in, and from there you can decide what you wish to do with it.
The challenge is oftentimes to filter and ‘massage’ the logs when it hits Alienvault. There are a few approaches to this:
The basics are at stage 1 where the client (server, workstation etc) send logs (or have logs to be collected) to Alienvault. The initial filtering should theoretically happen here if possible. Many applications have the capability to control their logs – Windows server being one of them. Turning on debug logs on Linux for instance would cause a fair bit of log traffic across the network. Applications as well, have options of what to log and what not to log. We see firewalls logging traffic logs, proxies logging every single connection that goes through – this causes loads of logs hitting the Alienvault.
AV (especially the All In Ones) isn’t designed to take on heavy loads the way Splunk or other enterprise SIEM like ArcSight, that chews through 100,000 EPS like Galactus chews through planets. The AV approach has always been, we aren’t a SIEM only, we are a unified security management system, so security logs are what we are after. Correlation is what we are after. APT are what we are after. Their philosophy isn’t to overload and do generic Business Intelligence with millions of log lines, but to focus on Security and what is happening to your network. That being said, it’s no pushover as well, being able to work with 90 – 120 million events and going through 15,000 EPS on their enterprise.
The reality however is that most clients just turn on logs at Item 1 and plow these logs over to Alienvault. So it’s really up to Alienvault to start filtering these logs and stopping them coming in. At layer 2, is what we call the outer layer. This is the front line defence against these attacks of logs. These are where the engine running these log systems (OSSEC, rsyslog etc) can filter out and then trickle what is needed to Alienvault main engine itself in Layer 3. The AV main engine also has its form of defence, in policies, where we can create ‘junk’ policies to simply ignore logs coming in and not process them through the resource intensive risk assessment calculations.
So, we are going to assume that Layer 1 filtering wasn’t done. What we are going to look at is sorting out Layer 2 and we will assume that logs are coming in via OSSEC. We will have another article on Rsyslog filtering because that is a whole different novel to write.
When it hits OSSEC, it’s going via default port 1514/udp. Now remember, when logs first enters Alienvault, it doesn’t immediately go into the SIEM event display. It first needs to be logged, before it can be turned into events, before it can trigger alarms. So the basic rule is to get it logged:
Make sure you are receiving logs first.
This may seem juvenile in terms of understanding but we have been through enough to know that no matter WHAT the client says, oftentimes, their systems are not even sending the logs to us! A simple tcpdump -Xni eth0 “udp port 1514” will see if the logs are getting in, so go ahead with that first to ensure you are receiving. Just add a “and host <ip address>” if you need to filter it by the IP address.
Another way that Alienvault allows, when you are getting logs via HIDS/OSSEC is by enabling the “logall” on USM HIDS configuration, which we covered in the previous articles here. But be aware turning on logall potentially will bring a lot of logs and information into the box so we generally avoid this unless it’s really needed.
Once you are seeing logs coming into Alienvault, for OSSEC at least the next thing to do is to move these logs to “alerts.log” and from there, Alienvault can start putting it into the SIEM display.
For this to happen, you need to understand 3 things here, aside from the fact that we are currently now working on layer 2 from the diagram above – OSSEC:
a) Decoders
b) Rules
c) /var/ossec/bin/ossec-logtest
The above are actually OSSEC terminologies – not strictly Alienvault. What this means is that if you were to decouple OSSEC from Alienvault, you can. You can just download OSSEC. Or you could download other products like Wazuh, which is also another product we carry. Wazuh runs OSSEC (its own flavor) but has a different presentation layer (Layer 3 in our diagram above) and integrates with ELK to provide a more enterprise ready product but the foundation came from the same OSSEC principles. So when we talk about Rules and Decoders and using the ossec-logtest script to test your stuff, it’s not an Alienvault specific talk. Alienvault specific talk we can go later with plugins and stuff. In the actual ACSE course from Alienvault (at least the one I passed 5 years ago), there is really no mention on decoders and rules – it basically just focus on the core Alienvault items only.
At this point, we need to make the decision on whether to have the filtering done on OSSEC level (2) or on Alienvault level (3)? As a rule, the closer the filtering is done to source, the better…however, in our opinion, the filtering by Alienvault plugins is a lot more flexible and intuitive in design, compared to OSSEC (and because we are biasedly trained in Alienvault, but not so much in OSSEC). So for this article (which is taking VERY long in getting to its point), we are tasked to simply funnel the logs into /var/ossec/logs/alerts/alerts.log because that is where OSSEC sends its logs to and where we can get our AV plugins to read from.
The logs in /var/ossec/logs/archives/archives.log (remember, we turned on the logall option in the OSSEC configuration for this illustration) aren’t monitored by plugins. Because in a production environment, you won’t have that turned on. So, once you have logs into the alerts.log file, you are good to go, because then you can sit down and write plugins for Alienvault to use in the SIEM display.
OK – Firstly Decoders. OSSEC has a bunch of default decoders (like plugins in Alienvault) that is able to interpret a whole bunch of logs coming in. Basically, the decoder is set up with Regular expression to go through a particular file and just grab the information from the file and drop it into fields like IP address, date, source IPs etc. Similar to the AV plugin, but for this illustration, we are not going to use much of the OSSEC filtering, but simply to ensure we select the right logs and send them over to the alerts.log file.
So ok, let’s take the previous article example of having MySQL logs into Alienvault. Let’s say we have this example query log coming into our Alienvault (archive.log, if we turned it on)
2021 Feb 21 00:46:05 (Host-192-168-1-62) 192.168.1.62->\MySQLLOG/db.log 2021-02-22T09:41:42.271529Z 28 Query SHOW CREATE TABLE db.persons
So the above doesn’t really offer much, but you can technically see there is the date and time, and the command line etc and a decoder will need to be created to parse the incoming log.
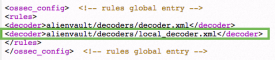
Picking up from where we left off at the Alienvault link, Task 4 covers the steps to create the decoder:
a) Edit /var/ossec/alienvault/decoders/local_decoder.xml and add in the following:
The above is simplistic decoder to catch the 3 important events from the logs coming in from MySQL – Query log, i.e
2021-02-22T09:41:42.271529Z 28 Query SHOW CREATE TABLE db.persons
Connect Log
2021-02-20T16:35:28.019734Z 8 Connect root@localhost on using SSL/TLS
Quit
2021-02-20T18:29:35.626687Z 13 Quit
Now of course, for those aware, the Query logs have many different types of query – Query Use, Query Show, Query Select, Query Set, Query Insert, Query Update and so on. The idea of the decoder is simply to catch all the queries, and we will theoretically log all Queries into Alienvault.
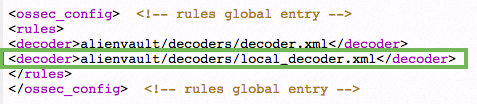
Now, remember to tell Alienvault you have a new decoder file
In the USM Appliance web UI, go to Environment > Detection > HIDS > Config > Configuration.
Add <decoder>alienvault/decoders/local_decoder.xml</decoder> after <decoder> :
Adding this setting enables the usage of a custom decoder. Save it and restart HIDS.
So that’s it for the decoder.
Now, on the CLI, go to /var/ossec/bin and run ./ossec-logtest
Paste the following “2021-02-20T18:29:43.189931Z 15 Query SET NAMES utf8mb4”
And you should the get result as below
linux:/var/ossec/bin# ./ossec-logtest
 2021/03/29 09:50:10 ossec-testrule: INFO: Reading decoder file alienvault/decoders/decoder.xml.
 2021/03/29 09:50:10 ossec-testrule: INFO: Reading decoder file alienvault/decoders/local_decoder.xml.
 2021/03/29 09:50:10 ossec-testrule: INFO: Started (pid: 25070).
 ossec-testrule: Type one log per line.
 2021-02-20T18:29:43.189931Z        15 Query     SET NAMES utf8mb4
 **Phase 1: Completed pre-decoding.
        full event: '2021-02-20T18:29:43.189931Z    15 Query     SET NAMES utf8mb4'
        hostname: 'linux'
        program_name: '(null)'
        log: '2021-02-20T18:29:43.189931Z           15 Query     SET NAMES utf8mb4'
 **Phase 2: Completed decoding.
        decoder: 'mysql-query'
So basically, any logs that come into archive.log that has that sample line “Query” you will be lumping it in as mysql-query decoded. Of course you can further refine it with Regular expression to get the exact term you wish, but for the illustration, we want to catch the queries here and it’s fine for now.
The next item is the rules. Again, referring to the Alienvault writeup above, go ahead and edit /var/ossec/alienvault/rules/local_rules.xml.
What we will do is to add the following in
<group name="mysql-connect">
<rule id="192000" level="0">
<decoded_as>mysql-connect</decoded_as>
<description>Connect log is enabled</description>
</rule>

<rule id="192001" level="1">
<if_sid>192000</if_sid>
<regex>Connect\s*</regex>
<description>Connection is found</description>
</rule>
</group>


<group name="mysql-query">
<rule id="195000" level="0">
<decoded_as>mysql-query</decoded_as>
<description>Mysql Query log is enabled!</description>
</rule>


<rule id="195001" level="0">
<if_sid>195000</if_sid>
<match>SET</match>
<description>Query set is found and ignored!</description>
</rule>


<rule id="195002" level="1">
<if_sid>195000</if_sid>
<regex>Query\s*</regex>
<description>Query is found</description>
</rule>
</group>


<group name="mysql-quit">
<rule id="194000" level="0">
<decoded_as>mysql-quit</decoded_as>
<description> Quit log is enabled</description>
</rule>

<rule id="194001" level="1">
<if_sid>194000</if_sid>
<regex>Quit\s*</regex>
<description>Quit command is found</description>
</rule>
</group>
So what the above does is to decide what to do with 3 types of MySQL logs you are getting: Connect, Query and Quit. We want to dump these logs into alerts.log so that we can work on it with Alienvault’s plugin. We don’t want to do any fancy stuff here so it’s pretty straightforward.
Each of these 3 have a foundation rule
a) Connect – 192000
b) Quit – 194000
c) Query – 195000
Each rule has a nested rule to decide what to do with it. Notice you can actually do Regex or Match on the rules which really provides a lot of flexibility in filtering. In fact, if it wasn’t for Alienvault’s plugins, OSSEC’s filtering would probably be sufficient for most of your custom logs requirement.
For this illustration, our job is simple – for each of these rules, find out the key word in the log, and then escalate it to an alert. An alert is created when you create a rule ID with level = 1, i.e <rule id=”195002″ level=”1″>
If you run ossec-logtest again, and paste the log there, you would be able to see
**Phase 1: Completed pre-decoding.
        full event: '2021 Feb 21 00:46:46 (Host-192-168-1-62) 192.168.1.62->\MySQLLOG/db.log 2021-02-22T09:42:21.711131Z        28 Quit'
        hostname: '(Host-192-168-1-62)'
        program_name: '(null)'
        log: '192.168.1.62->\MySQLLOG/db.log 2021-02-22T09:42:21.711131Z        28 Quit'
 **Phase 2: Completed decoding.
        decoder: 'mysql-quit'
 **Phase 3: Completed filtering (rules).
        Rule id: '194001'
        Level: '1'
        Description: 'Quit command is found'
 **Alert to be generated.
Once you see “alert to be generated” you will find that same alert in the /var/ossec/logs/alerts/alerts.log
From there, you can go about doing the plugins and getting it into the SIEM.
Whew. That’s it.
You would notice, however, there is another sub-rules in there for Query:
<rule id="195001" level="0">
<if_sid>195000</if_sid>
<match>SET</match>
<description>Query set is found and ignored!</description>
</rule>
This is set above the “alert” rule and you notice that this is Level=0. This means whatever Query that is decoded, first runs this rule and basically if I see there is a Query “SET”, I am going to ignore it. I.e it’s not a log I want and I am not going to put it into the alerts.log. Level 0 means, not to alert.
I am ignoring Query Set because in this case, we are finding millions of query set as it is invoked a lot of times and mostly it is false positives. I am interested in Query Selects, Inserts and Updates etc.
Once you have this rule put in, it will filter out all Query Sets. This is basically the only filtering we are doing so we don’t have those millions of Query Sets jamming up my alerts.log file in Alienvault.
alienvault:/var/ossec/logs/archives# ossec-logtest
 2021/03/14 12:36:33 ossec-testrule: INFO: Reading decoder file alienvault/decoders/decoder.xml.
 2021/03/14 12:36:33 ossec-testrule: INFO: Reading decoder file alienvault/decoders/local_decoder.xml.
 2021/03/14 12:36:33 ossec-testrule: INFO: Started (pid: 12550).
 ossec-testrule: Type one log per line.
 192.168.1.62->\MySQLLOG/db.log 2021-03-14T16:22:58.573134Z        19 Query     SET NAMES utf8mb4'
 **Phase 1: Completed pre-decoding.
        full event: '192.168.1.62->\MySQLLOG/db.log 2021-03-14T16:22:58.573134Z        19 Query     SET NAMES utf8mb4''
        hostname: 'alienvault'
        program_name: '(null)'
        log: '192.168.1.62->\MySQLLOG/db.log 2021-03-14T16:22:58.573134Z        19 Query     SET NAMES utf8mb4''
 **Phase 2: Completed decoding.
        decoder: 'mysql-query'
 **Phase 3: Completed filtering (rules).
        Rule id: '195001'
        Level: '0'
        Description: 'Query set is found and ignored!'
So you see, from the above, all Query Sets are ignored. You can basically do whatever you wish by using either Regex or Match and ignore certain log messages from OSSEC itself. It’s very powerful and flexible and with enough time and effort, you can really filter out only the needed logs you want into Alienvault, which is really part of the fine-tuning process for SIEM.
So there you have it. What you have done now is to take those logs from archives.log and make sure you only put the logs you want in alerts.log (Quit, Connect, All Query except for Query Set).
The next thing you need to do is to go down to Alienvault (layer 3) and do the heavy lifting in writing plugins and get these events into the SIEM display.
For more information for Alienvault and how it can help your compliance, send us an email at alienvault@pkfmalaysia.com and we will get back to you ASAP!
So from our previous article we have gotten Alienvault (or OSSIM) running in your own Virtualbox, and it is able to communicate with the host (your laptop). Again, the reason why we have this is for a small mini lab that you can just shoot up without worrying about doing a VPN connectivity back to the office or whereever, and just do a very basic troubleshooting or learning. It’s highly useful for us, especially we deal a lot with custom applications plugins where we need to either filter or interpret using Alienvault.
So the objective here is to first get MySQL installed and running, and then have MySQL start logging. Now, for the sake of standardisation, we are going to install MySQL Community Edition. Instead of detailing all the complexity of Windows installation, we will keep it brief: Download, click, wait, done.
The more detailed link is as below, but in all honesty, there is nothing overly difficult with clicking on the windows installation file. Locating where you downloaded it is probably a bit more difficult that the actual installation itself.
Once it’s installed, (we just installed it as a service), verify that its up and running by going to the Windows services and checking for MySQL80. Or you could just run netstat – an and find the following:
TCP 0.0.0.0:3306 0.0.0.0:0 LISTENING
Next, for the sake of laziness, you probably want to add the MySQL Bin path to your windows environmental variable path: C:\Program Files\MySQL\MySQL Shell 8.0\bin\. Just go System Properties ->Advance -> Environmental Variables.
Once that is done, you can run the command
mysql -u username -p
You should be prompted with a password and you can enter that and you should be in.
Now, we are not going to go through mysql CLI commands as this isn’t the point of the article. The point here is to create some sort of logs from MySQL and fetch those logs over to Alienvault. There are many ways to do it, and it seems for windows, the easiest would be to just dump it into the event viewer and let HIDS go and fetch it. But we don’t like to do things the easy way because we are technology sadists. So the idea here is to log MySQL to a flat file and get HIDS to grab it and get Alienvault to interpret it.
We are a big fan of the above plugin, as most of our clients tend to end up with MySQL Community Edition, which means some plugins like the official MySQL Enterprise Audit Plugin is not available for cheapskate like us. There is the Percona Audit plugin as well which we have not tried but it seems very much focused on Percona. There is also the McAfee plugin which we tried but after a bit of tinkering decided we were probably too stupid busy to make it work. So we were left with the MariaDB plugin which we got it to work for our client.
It’s still a good read but it has been a few years old. And we will definitely relook into it in the near future.
This time around, we are going to get MySQL Windows version to write the general query log into a flat file instead and have HIDS pick it up. This provides us with a few ideas of how HIDS/Alienvault can be configured to pick up any flat file, which gives you pretty much God-like powers in terms of being flexible in getting logs to your Alienvault. If we can get any flat file and create events from those, the possibility to integrate with any custom applications is endless.
To start you need to be aware of two things:
a) There is already a native logging capability in MySQL CE to log to a flat file which we will be using for illustrative purpose: the all powerful “General query” log. Why we say illustrative is that this isn’t probably a long term solution as it’s akin to turning on a debug on your app. There is a LOT of logs, because every query is logged. Useful for troubleshooting, not so cool if you have a busy server because it grows pretty quickly.
b) Windows doesn’t have a native way to send logs, except by way of WEF (Windows Event Forwarder) which basically just sends logs to a collector (windows system). It seems like an awfully clunky way to do log centralisation, so its probably better (still in 2021!) to use either a forwarder like NXLOG or install OSSEC (HIDS) as an agent to talk to Alienvault.
So for this article, we will start by enabling general query log on your Windows MySQL instance.
mysql> set global general_log_file='C:\MySQLLOG\db.log';
 Query OK, 0 rows affected (2.39 sec)

 mysql> set global log_output = 'file';
 Query OK, 0 rows affected (0.00 sec)

 mysql> set global general_log = on;
 Query OK, 0 rows affected (0.00 sec)

 mysql> show variables like '%general%';
 +------------------+----------------------------+
 | Variable_name    | Value                      |
 +------------------+----------------------------+
 | general_log      | ON                         |
 | general_log_file | C:/MySQLLOG/db.log         |
 +------------------+----------------------------+
 2 rows in set (0.01 sec)
The above series of commands basically just tells MySQL to turn on general log, and then say where the the file is located and instruct it to be a file. You can verify if it is set by the last command.
For more persistence, you can go ahead and and edit C:\ProgramData\MySQL\MySQL Server 8.0\my.ini
And include the following under the header General and Slow Logging
#General and Slow logging.
 log-output=FILE
 general-log=1
 general_log_file="C:/MySQLLOG/db.log"
Restart your service and you should be able to see if there is a db.log file (You can name it anything).
Try to do a login with your mysql console and you should be able to see a “Connect” log and a few query logs in the flat file.
Now, the next thing is to find a way to forward these logs over to Alienvault. So you could use NXLOG (we covered that in detailed in a series here) However, that topic has been beaten to death over that series so we won’t look at that option for now.
So for the sake of brevity, the Part 1 link should be very straightforward to follow. Install OSSEC HIDS into your laptop (which is also your MySQL server), but of course, change the OSSEC config to reflect the proper path and file of the flat file log of MySQL that you just created here.
So the conclusion of it is this:
a) You have a running MySQL server and you are able to query and log to it. I would suggest at this point to install a MySQL gui like HeidiSQL or PHPMyadmin to interact with your database. If you are fine with Workbench or CLI, then go ahead. For me, I like HeidiSQL because its clean, and very useful for simple testing and querying.
b) Your MySQL is logging into a flatfile of your choosing, every single log. Again, since this is a test, it’s fine. For a live server, be aware to have a cleanup script in place to ensure your general query log doesn’t over grow.
c) You have HIDS (OSSEC) – we use both interchangeably, so you know – installed on your laptop server, and it’s configured to pick up the logs from the flat file of MySQL that you have configured
d) On the OSSIM (Alienvault) – we use both interchangeably, so you know – on your Virtualbox, you have enabled HIDS to logall so the raw log is now dumped into archives.log (which we would recommend to remove the logall directive once we finish configuring, since this file will also grow quickly on live environment).
At this point, if you were to open up the /var/ossec/logs/archives/archives.log of your Alienvault, you would observe that the format of the log coming in is
2021 Feb 22 09:41:42 (Host-192-168-1-111) 192.168.1.111->\MySQLLOG/db.log 2021-02-22T09:41:42.271529Z 28 Query SHOW CREATE TABLE dbtest.persons
Compared to the log from the database file itself
 2021-02-22T09:41:42.271529Z         28 Query SHOW
CREATE TABLE dbtest.persons
So it is actually word for word, the actual log itself. That’s great but aside from centralisation, it’s actually not doing anything (sort of like Batman in Justice League). It’s just there, with no purpose.
In our next article (which we will call Flat file log capture part 2), we will break down the structure in which logs flow into Alienvault and how ultimately we can get these logs to eventually be seen in the SIEM event.
Ok, it’s been a while since we last written anything close to being technical, so let’s quickly get to it.
Many times, we would like to get some quick testing done on an Alienvault box but we don’t have any at hand. Some of these tests are for example, to validate a plugin you just wrote, or to check on a config that you would want to implement for your client but don’t want to test it there. There are many scenarios where you’d just want to fire up a simple box and do some testing. One way is to set up an Alienvault in your office and a couple of servers to run as test systems. A simple VPN in and voila, you are done. But what if you wanted to simulate logs, but don’t have the necessary systems to do so, or rather not change any production systems you have at hand?
One way is to install Alienvault on virtualbox on your laptop, and either simulate logs from other VMs to it, or just get your host laptop to send the guest Alienvault logs. Virtualbox is probably the easiest way to get it done. You don’t need to set it up as an extremely powerful system, since mostly you would be doing testing on it. For me, simply using it for plugin verification, decoder, rules set up and simple log testing was enough. I set the VM up for 2 processors, 8GB RAM, 30GB storage (fixed) and downloaded the OSSIM image to set it up.
To further simplify, we followed this excellent tutorial here. Kudos to the writer for the details. So the idea was two fold, to get our host talking to OSSIM and for OSSIM to be able to go to the internet. The trickiest part of this relatively simple setup is to get the networking sorted.
OSSIM allows two interfaces to be setup in theory – whereby one is used for management interface and the other for log collections. The slight difference here is that I’ve set up the eth0 as ‘bridged adapter’ and selected my laptop’s wireless adapter, and in theory this should allow internet access as required. The second adapter in theory, wouldn’t really be needed, as it’s generally used if you are accessing it from internally (let’s say you set up Virtualbox in a separate box and you access it from an internal network). But because I am building it all in one (everything in a single laptop), I don’t need that second interface as I can just access my management interface through my logging interface. So go ahead and just set up eth0 as bridge and later on, assign the IP to be the same network as your laptop’s network.
The strange thing you may experience from time to time is that you may not be able to SSH into your OSSIM for some reason. It could be an IP conflict or your ARP needs to be updated, especially if you have other systems with the same IP. So you could try just pinging from the server to the host, and host to the server and that may resolve that issue.
Now you are done, go ahead and access your OSSIM. In our next article, we can start a very simple tutorial of setting up a MYSQL database (also within the same laptop), writing a log file to a file and getting Alienvault to pick up the log file via HIDS.
The opinions expressed by our writers and those providing comments are theirs alone, and do not necessarily reflect the views of PKF Avant Edge Sdn Bhd. PKF Avant Edge Sdn Bhd is not responsible for the accuracy of any of the information supplied by our writers.
The material on this site is for general information purposes only and should not be relied upon for making business, legal or other decisions. We make no representations or warranties of any kind, express or implied about the completeness, accuracy, reliability, sustainability or availability with respect to the website or the information, products, services or related graphics contained on the website for any purpose. Any reliance you place on such material is therefore strictly at your own risk.
Certain links on this website will lead to websites not under the control of PKF Avant Edge Sdn Bhd. When you activate these, you will leave our site and we have no control over and accept no liability in respect of materials, products or services available on any website not under our control.
To the extent not prohibited by law, in no circumstances shall PKF Avant Edge Sdn Bhd be liable to you or any third parties for any loss or damage arising directly or indirectly from your use of or inability to use, this site or any of the material contained in it.
