Every once in a while, we take a break from boring compliance articles and write what’s more interesting – fixing broken stuff or troubleshooting problems that has nothing to do with human beings. It’s far easier dealing with machines.
So, what happened was, we had a USB plugged into one of our servers and doing some file transfers. The server wasn’t hooked up onto our UPS, as this was a test system – ok, it was actually sitting under my desk and everytime I turned it on, everyone in the office thinks a helicopter is outside the window. It’s old and loud and totally unsuitable to be located outside of a server room. Ah well.
In any case, halfway through the transfer, the power tripped. The server was ok upon restart but not the USB external drive.
It demonstrated a few symptoms:
a) When plugged in, the drive does whir up and explorer recognises it. The problem was it was listed as ‘Local Drive’ and nothing else, no other information. When clicked, it just freezes up everything. Right click does eventually brings up the context menu but when ‘Properties’ is selected, it hangs and never proceeds. So trying to scan the drive for errors from the GUI is a no go.
b) Command line wise – when accessing G:, again it just hangs. Chkdsk /f also hangs from command line so trying to scan from command line = no go.
c) Going into disk management GUI, it takes a long time before it eventually pops up and the good news was that disk management actually saw the drive. However, right clicking on it and trying to reassign the drive letter (as suggested by some other articles to recover), we get this annoying message:
The operation failed to complete because the Disk Management console view is not up-to-date. Refresh the view by using the refresh task. If the problem persists close the Disk Management console, then restart Disk Management or restart the computer
Microsoft being cryptic and mysterious
So like Lemmings, we proceed to refresh the console with F5 and it just hangs indefinitely and nothing happens until we unplug the drive. Then a string of errors come out like Location of drive cannot be found etc. It seems the auto opening of the USB drive was activated but Windows just couldn’t read the drive. So disk management is a no-go.
d) We tried installing other software like Acronis, or Easeus but none of these managed to read the hard drive and simply hangs until we unplug it.
e) Changing laptops/desktops/cables (all running Windows) – all the same result. The drive was acknowledged but explorer or other programs couldn’t open anything on it. This is good news actually; it doesn’t seem there was a hardware issue or any dreaded clicking noise indicating the drive was a dead duck.
f) So it does point to a software layer issue, which should be handled with a scan disk or check disk by Windows. However the problem is, the disk couldn’t be read, so it couldn’t be scanned. Booting into safe mode doesn’t help anything. Reinstalling the USB drivers doesn’t help. The drive simply refuses to go to work, like all of us on a Monday morning after being smashed with a hangover from a Sunday night out.
g) Finally, on event viewer under Windows Logs -> System, this particular classic comes up: “An error was detected on device \Device\Harddisk2\DR21 during a paging operation.” So if you go to advanced under system properties -> Performance ->Settings ->Advanced. Under virtual memory, you could uncheck the box to automatically manage the paging file size if you can. But no, Windows doesn’t read the drive, so clicking on G: once more hangs the whole system.
At this point we have wasted an hour trying to sort this nonsense out. Nothing in Windows was able to indicate the issue. One suggested running fsutil from command line. This can check for the dirty bit on NTFS, which is an annoying feature that basically renders the drive useless until the bit is ‘cleared’.
The problem with this was – yes, you got it – you couldn’t run any command on that drive as it just hangs. Nothing, no programs in Windows was able to do anything for this drive.
The Dirty Bit
So some definitions first – the dirty bit is a modified bit. It refers to a bit in memory, which switches on when an update is made to a page by computer hardware. It is just a 1 hex value situated in some place hidden on the portable hard drive.
From Microsoft definition
A volume’s dirty bit indicates that the file system may be in an inconsistent state. The dirty bit can be set because:
- The volume is online and it has outstanding changes.
- Changes were made to the volume and the computer was shut down before the changes were committed to the disk.
- Corruption was detected on the volume.
If the dirty bit is set when the computer restarts, chkdsk runs to verify the file system integrity and to attempt to fix any issues with the volume. (In our case, this didn’t happen, obviously).
Assuming that this was a dirty bit problem (at this point, we were just shooting in the dark due to the lack of diagnostics, logs or events and we were just working on with some black magic of guessing).
From some articles in the net, the options to remove the dirty bit as follows:
- You have 3 options to remove dirty bits from your computer. The first option is to trust the Microsoft disk checking utility by finishing a disk check operation. [This didn’t work as Windows wasn’t able to read ANYTHING and we could not run any windows based operations or commands or programs on it.]
- The second method is that you move the data from the volume and format the drive. After that, move the data back. [This is way too much work. Plus, Windows can’t even access it. So the only option is to do a clone such as through Clonezilla? That’s a lot of work. And a last resort.]
- The third method to remove the dirty bit is by using a hex editor with disk editing supported. [We didn’t explore this as this seemed a bit extreme, and probably the last time we handled a hex editor was when we had to hack in some computer games like Football Manager to give unlimited funds or a 99 in dribbling skills]
There’s an easier way.
So this is where you just need to give up on Windows and figure another way to check this disk. If you have a standby Linux box or Mac, that would help. But if not, you could actually use this great little tool called SystemRescue which among other tools, have the delectable DDRescue and Ntfs3g which will be important.
Boot up to SystemRescue (you can make a boot disk with DDRescue which is very much recommended – just use Rufus or another program to make it bootable, and download the distribution https://www.system-rescue.org/) and you basically now have a nice little Linux distro running from your USB and you should be able to also see your USB mounted with the command lsusb or lsblk.
Using lsblk -o gives you a view to see the type, size, device and a few more details. The below is an example (not ours)
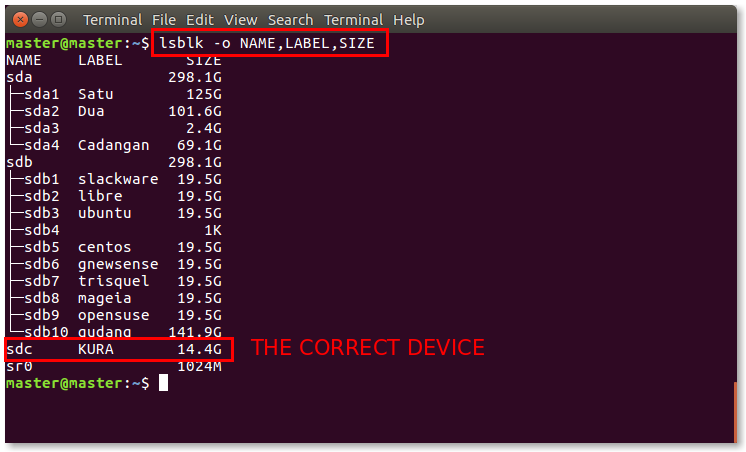
Just identify which is your USB drive.
Using a the nifty ntfsfix (assuming /dev/sda1 is the USB drive you want to fix)
ntfsfix -d /dev/sda1This basically clears the dirty bit which Windows for whatever reason, finds it so difficult to do and makes us jumps through hoops. In fact, fsutils from Windows only tells you that you have a dirty bit but doesn’t clear it. That’s like paying a doctor to tell you that you have cancer and not providing you any healthcare to it. Come on, Microsoft.
So right after clearing the dirty bit, the external drive is once again accessible. There were still some errors on the drive, but we just ran the check for errors option via GUI (since now we are able to access the properties of the drive again by right clicking for the context menu), and fixed up the inaccessible files.
So now you know. The next time you have an outage during a file transfer, it could just be the dirty bit. The problem is the diagnosis (again, Windows could just put into the event that there is a dirty bit set instead of leading us to this paging file nonsense treasure hunt). And of course, if Windows cannot access, using the SystemRescue utility, it’s a great tool to solve this issue.
And finally, according to some, another even easier way is to just plug in this drive into a Mac and apparently, it resets the dirty bit for some reason. I never tried this, so perhaps others can give it a try first before going the SystemRescue way.
Contact us at avantedge@pkfmalaysia.com for more information on what services we can offer you.
Have a good week dealing with human beings!