
When we started out with Alienvault years ago, they were just a smallish, start up company and we worked directly almost with the engineers and sales team in Cork. Of course, a lot has changed since AT&T took over, but during the early days, there were a lot of knowledge and mindshare done directly between us and them. So much so that if you were to check their partner site, they still list us as the only Malaysian company as their reseller, due to the early days of listing. What attracted us to the product was that we could lift the hood and see what was underneath. Alienvault (or OSSIM) was previously a hodgepodge of many working parts that were glued together and somehow made to work. The agent was a product called OSSEC, which is an open-source HIDS. The IDS is Suricata/Snort and if you look closely at the availability tool, you would see the backend is a Nagios running. NFSen is used for their netflow data display, and PRADS for their asset discovery. OPENVAS is their vulnerability scanner and best of all, they allow you to jailbreak the system and go into the OS itself and do what you need to do. In fact, most of the time, we are more comfortable on the command line than through the actual UI itself.
The history aside, the downside of adding in these different applications and getting them all to play nice together, is that you would have to understand the interworkings of these pieces.
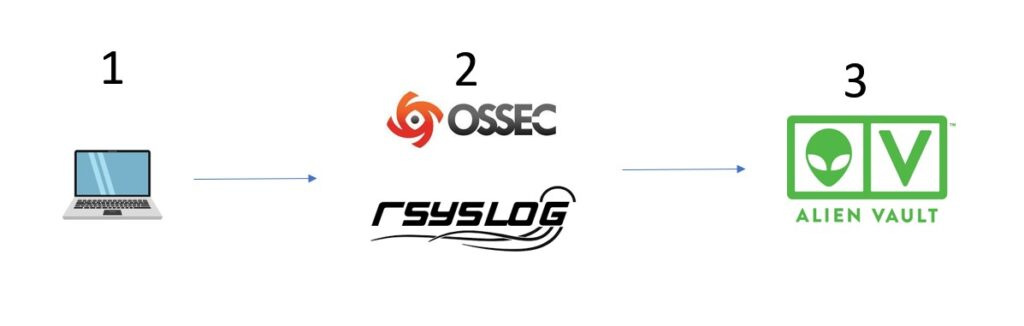
For instance, if you were to send logs via Syslog to Alienvault, you would have to know that the daemon rsyslog (not an Alienvault product) is the one being used to receive these logs. If you were to use the agent, then the application receiving these logs is different – it’s the OSSEC server that receives it. So it depends how logs come in, and from there you can decide what you wish to do with it.
The challenge is oftentimes to filter and ‘massage’ the logs when it hits Alienvault. There are a few approaches to this:
The basics are at stage 1 where the client (server, workstation etc) send logs (or have logs to be collected) to Alienvault. The initial filtering should theoretically happen here if possible. Many applications have the capability to control their logs – Windows server being one of them. Turning on debug logs on Linux for instance would cause a fair bit of log traffic across the network. Applications as well, have options of what to log and what not to log. We see firewalls logging traffic logs, proxies logging every single connection that goes through – this causes loads of logs hitting the Alienvault.
AV (especially the All In Ones) isn’t designed to take on heavy loads the way Splunk or other enterprise SIEM like ArcSight, that chews through 100,000 EPS like Galactus chews through planets. The AV approach has always been, we aren’t a SIEM only, we are a unified security management system, so security logs are what we are after. Correlation is what we are after. APT are what we are after. Their philosophy isn’t to overload and do generic Business Intelligence with millions of log lines, but to focus on Security and what is happening to your network. That being said, it’s no pushover as well, being able to work with 90 – 120 million events and going through 15,000 EPS on their enterprise.
The reality however is that most clients just turn on logs at Item 1 and plow these logs over to Alienvault. So it’s really up to Alienvault to start filtering these logs and stopping them coming in. At layer 2, is what we call the outer layer. This is the front line defence against these attacks of logs. These are where the engine running these log systems (OSSEC, rsyslog etc) can filter out and then trickle what is needed to Alienvault main engine itself in Layer 3. The AV main engine also has its form of defence, in policies, where we can create ‘junk’ policies to simply ignore logs coming in and not process them through the resource intensive risk assessment calculations.
So, we are going to assume that Layer 1 filtering wasn’t done. What we are going to look at is sorting out Layer 2 and we will assume that logs are coming in via OSSEC. We will have another article on Rsyslog filtering because that is a whole different novel to write.
When it hits OSSEC, it’s going via default port 1514/udp. Now remember, when logs first enters Alienvault, it doesn’t immediately go into the SIEM event display. It first needs to be logged, before it can be turned into events, before it can trigger alarms. So the basic rule is to get it logged:
Make sure you are receiving logs first.
This may seem juvenile in terms of understanding but we have been through enough to know that no matter WHAT the client says, oftentimes, their systems are not even sending the logs to us! A simple tcpdump -Xni eth0 “udp port 1514” will see if the logs are getting in, so go ahead with that first to ensure you are receiving. Just add a “and host <ip address>” if you need to filter it by the IP address.
Another way that Alienvault allows, when you are getting logs via HIDS/OSSEC is by enabling the “logall” on USM HIDS configuration, which we covered in the previous articles here. But be aware turning on logall potentially will bring a lot of logs and information into the box so we generally avoid this unless it’s really needed.
Once you are seeing logs coming into Alienvault, for OSSEC at least the next thing to do is to move these logs to “alerts.log” and from there, Alienvault can start putting it into the SIEM display.
For this to happen, you need to understand 3 things here, aside from the fact that we are currently now working on layer 2 from the diagram above – OSSEC:
a) Decoders
b) Rules
c) /var/ossec/bin/ossec-logtest
The above are actually OSSEC terminologies – not strictly Alienvault. What this means is that if you were to decouple OSSEC from Alienvault, you can. You can just download OSSEC. Or you could download other products like Wazuh, which is also another product we carry. Wazuh runs OSSEC (its own flavor) but has a different presentation layer (Layer 3 in our diagram above) and integrates with ELK to provide a more enterprise ready product but the foundation came from the same OSSEC principles. So when we talk about Rules and Decoders and using the ossec-logtest script to test your stuff, it’s not an Alienvault specific talk. Alienvault specific talk we can go later with plugins and stuff. In the actual ACSE course from Alienvault (at least the one I passed 5 years ago), there is really no mention on decoders and rules – it basically just focus on the core Alienvault items only.
At this point, we need to make the decision on whether to have the filtering done on OSSEC level (2) or on Alienvault level (3)? As a rule, the closer the filtering is done to source, the better…however, in our opinion, the filtering by Alienvault plugins is a lot more flexible and intuitive in design, compared to OSSEC (and because we are biasedly trained in Alienvault, but not so much in OSSEC). So for this article (which is taking VERY long in getting to its point), we are tasked to simply funnel the logs into /var/ossec/logs/alerts/alerts.log because that is where OSSEC sends its logs to and where we can get our AV plugins to read from.
The logs in /var/ossec/logs/archives/archives.log (remember, we turned on the logall option in the OSSEC configuration for this illustration) aren’t monitored by plugins. Because in a production environment, you won’t have that turned on. So, once you have logs into the alerts.log file, you are good to go, because then you can sit down and write plugins for Alienvault to use in the SIEM display.
OK – Firstly Decoders. OSSEC has a bunch of default decoders (like plugins in Alienvault) that is able to interpret a whole bunch of logs coming in. Basically, the decoder is set up with Regular expression to go through a particular file and just grab the information from the file and drop it into fields like IP address, date, source IPs etc. Similar to the AV plugin, but for this illustration, we are not going to use much of the OSSEC filtering, but simply to ensure we select the right logs and send them over to the alerts.log file.
So ok, let’s take the previous article example of having MySQL logs into Alienvault. Let’s say we have this example query log coming into our Alienvault (archive.log, if we turned it on)
2021 Feb 21 00:46:05 (Host-192-168-1-62) 192.168.1.62->\MySQLLOG/db.log 2021-02-22T09:41:42.271529Z 28 Query SHOW CREATE TABLEdb.persons
So the above doesn’t really offer much, but you can technically see there is the date and time, and the command line etc and a decoder will need to be created to parse the incoming log.
Picking up from where we left off at the Alienvault link, Task 4 covers the steps to create the decoder:
a) Edit /var/ossec/alienvault/decoders/local_decoder.xml and add in the following:
<decoder name="mysql-query">
        <prematch> Query</prematch>
</decoder>
<decoder name="mysql-connect">
        <prematch> Connect\s*</prematch>
</decoder>
<decoder name="mysql-quit">
        <prematch> Quit</prematch>
</decoder>
The above is simplistic decoder to catch the 3 important events from the logs coming in from MySQL – Query log, i.e
2021-02-22T09:41:42.271529Z 28 Query SHOW CREATE TABLEdb.persons
Connect Log
2021-02-20T16:35:28.019734Z 8 Connect root@localhost on using SSL/TLS
Quit
2021-02-20T18:29:35.626687Z 13 Quit
Now of course, for those aware, the Query logs have many different types of query – Query Use, Query Show, Query Select, Query Set, Query Insert, Query Update and so on. The idea of the decoder is simply to catch all the queries, and we will theoretically log all Queries into Alienvault.
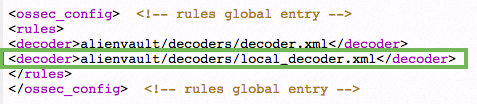
Now, remember to tell Alienvault you have a new decoder file
In the USM Appliance web UI, go to Environment > Detection > HIDS > Config > Configuration.
Add <decoder>alienvault/decoders/local_decoder.xml</decoder> after <decoder> :
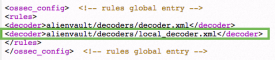
Adding this setting enables the usage of a custom decoder. Save it and restart HIDS.
So that’s it for the decoder.
Now, on the CLI, go to /var/ossec/bin and run ./ossec-logtest
Paste the following “2021-02-20T18:29:43.189931Z 15 Query SET NAMES utf8mb4”
And you should the get result as below
linux:/var/ossec/bin# ./ossec-logtest
 2021/03/29 09:50:10 ossec-testrule: INFO: Reading decoder file alienvault/decoders/decoder.xml.
 2021/03/29 09:50:10 ossec-testrule: INFO: Reading decoder file alienvault/decoders/local_decoder.xml.
 2021/03/29 09:50:10 ossec-testrule: INFO: Started (pid: 25070).
 ossec-testrule: Type one log per line.
 2021-02-20T18:29:43.189931Z        15 Query     SET NAMES utf8mb4
 **Phase 1: Completed pre-decoding.
        full event: '2021-02-20T18:29:43.189931Z    15 Query     SET NAMES utf8mb4'
        hostname: 'linux'
        program_name: '(null)'
        log: '2021-02-20T18:29:43.189931Z           15 Query     SET NAMES utf8mb4'
 **Phase 2: Completed decoding.
        decoder: 'mysql-query'
So basically, any logs that come into archive.log that has that sample line “Query” you will be lumping it in as mysql-query decoded. Of course you can further refine it with Regular expression to get the exact term you wish, but for the illustration, we want to catch the queries here and it’s fine for now.
The next item is the rules. Again, referring to the Alienvault writeup above, go ahead and edit
/var/ossec/alienvault/rules/local_rules.xml.
What we will do is to add the following in
<group name="mysql-connect">
<rule id="192000" level="0">
<decoded_as>mysql-connect</decoded_as>
<description>Connect log is enabled</description>
</rule>

<rule id="192001" level="1">
<if_sid>192000</if_sid>
<regex>Connect\s*</regex>
<description>Connection is found</description>
</rule>
</group>


<group name="mysql-query">
<rule id="195000" level="0">
<decoded_as>mysql-query</decoded_as>
<description>Mysql Query log is enabled!</description>
</rule>


<rule id="195001" level="0">
<if_sid>195000</if_sid>
<match>SET</match>
<description>Query set is found and ignored!</description>
</rule>


<rule id="195002" level="1">
<if_sid>195000</if_sid>
<regex>Query\s*</regex>
<description>Query is found</description>
</rule>
</group>


<group name="mysql-quit">
<rule id="194000" level="0">
<decoded_as>mysql-quit</decoded_as>
<description> Quit log is enabled</description>
</rule>

<rule id="194001" level="1">
<if_sid>194000</if_sid>
<regex>Quit\s*</regex>
<description>Quit command is found</description>
</rule>
</group>
So what the above does is to decide what to do with 3 types of MySQL logs you are getting: Connect, Query and Quit. We want to dump these logs into alerts.log so that we can work on it with Alienvault’s plugin. We don’t want to do any fancy stuff here so it’s pretty straightforward.
Each of these 3 have a foundation rule
a) Connect – 192000
b) Quit – 194000
c) Query – 195000
Each rule has a nested rule to decide what to do with it. Notice you can actually do Regex or Match on the rules which really provides a lot of flexibility in filtering. In fact, if it wasn’t for Alienvault’s plugins, OSSEC’s filtering would probably be sufficient for most of your custom logs requirement.
For this illustration, our job is simple – for each of these rules, find out the key word in the log, and then escalate it to an alert. An alert is created when you create a rule ID with level = 1, i.e <rule id=”195002″ level=”1″>
If you run ossec-logtest again, and paste the log there, you would be able to see
**Phase 1: Completed pre-decoding.
        full event: '2021 Feb 21 00:46:46 (Host-192-168-1-62) 192.168.1.62->\MySQLLOG/db.log 2021-02-22T09:42:21.711131Z        28 Quit'
        hostname: '(Host-192-168-1-62)'
        program_name: '(null)'
        log: '192.168.1.62->\MySQLLOG/db.log 2021-02-22T09:42:21.711131Z        28 Quit'
 **Phase 2: Completed decoding.
        decoder: 'mysql-quit'
 **Phase 3: Completed filtering (rules).
        Rule id: '194001'
        Level: '1'
        Description: 'Quit command is found'
 **Alert to be generated.
Once you see “alert to be generated” you will find that same alert in the /var/ossec/logs/alerts/alerts.log
AV - Alert - "1613881201" --> RID: "197011"; RL: "1"; RG: "connect"; RC: "Quit Command found"; USER: "None"; SRCIP: "None"; HOSTNAME: "(Host-192-168-1-62) 192.168.1.62->\MySQLLOG/db.log"; LOCATION: "(Host-192-168-1-62) 192.168.1.62->\MySQLLOG/db.log"; EVENT: "[INIT] 2021-02-22T09:42:21.711131Z 28 Quit [END]";
From there, you can go about doing the plugins and getting it into the SIEM.
Whew. That’s it.
You would notice, however, there is another sub-rules in there for Query:
<rule id="195001" level="0">
<if_sid>195000</if_sid>
<match>SET</match>
<description>Query set is found and ignored!</description>
</rule>
This is set above the “alert” rule and you notice that this is Level=0. This means whatever Query that is decoded, first runs this rule and basically if I see there is a Query “SET”, I am going to ignore it. I.e it’s not a log I want and I am not going to put it into the alerts.log. Level 0 means, not to alert.
I am ignoring Query Set because in this case, we are finding millions of query set as it is invoked a lot of times and mostly it is false positives. I am interested in Query Selects, Inserts and Updates etc.
Once you have this rule put in, it will filter out all Query Sets. This is basically the only filtering we are doing so we don’t have those millions of Query Sets jamming up my alerts.log file in Alienvault.
alienvault:/var/ossec/logs/archives# ossec-logtest
 2021/03/14 12:36:33 ossec-testrule: INFO: Reading decoder file alienvault/decoders/decoder.xml.
 2021/03/14 12:36:33 ossec-testrule: INFO: Reading decoder file alienvault/decoders/local_decoder.xml.
 2021/03/14 12:36:33 ossec-testrule: INFO: Started (pid: 12550).
 ossec-testrule: Type one log per line.
 192.168.1.62->\MySQLLOG/db.log 2021-03-14T16:22:58.573134Z        19 Query     SET NAMES utf8mb4'
 **Phase 1: Completed pre-decoding.
        full event: '192.168.1.62->\MySQLLOG/db.log 2021-03-14T16:22:58.573134Z        19 Query     SET NAMES utf8mb4''
        hostname: 'alienvault'
        program_name: '(null)'
        log: '192.168.1.62->\MySQLLOG/db.log 2021-03-14T16:22:58.573134Z        19 Query     SET NAMES utf8mb4''
 **Phase 2: Completed decoding.
        decoder: 'mysql-query'
 **Phase 3: Completed filtering (rules).
        Rule id: '195001'
        Level: '0'
        Description: 'Query set is found and ignored!'
So you see, from the above, all Query Sets are ignored. You can basically do whatever you wish by using either Regex or Match and ignore certain log messages from OSSEC itself. It’s very powerful and flexible and with enough time and effort, you can really filter out only the needed logs you want into Alienvault, which is really part of the fine-tuning process for SIEM.
So there you have it. What you have done now is to take those logs from archives.log and make sure you only put the logs you want in alerts.log (Quit, Connect, All Query except for Query Set).
The next thing you need to do is to go down to Alienvault (layer 3) and do the heavy lifting in writing plugins and get these events into the SIEM display.
For more information for Alienvault and how it can help your compliance, send us an email at alienvault@pkfmalaysia.com and we will get back to you ASAP!