Tag: siem (Page 1 of 3)

What the FIM is going on

If you have been doing PCI-DSS for some years, you have probably come across this term called FIM (File Integrity Montioring), which sometimes absolutely befuddles our customers. They generally think this is part of a wider SIEM or SOAR solution but not necessarily so. We’ll explore a little on why FIM is important, how it impacts PCI-DSS, some examples on configuration and what alternatives are there (if any). Here we go!

File Integrity Monitoring is the process of validating the integrity of operating system and application software files. It ensures that files have not been altered or compromised, whether maliciously or accidentally.

  1. Detecting Unauthorized Changes: FIM helps in detecting unauthorized changes to critical system files, configurations, and content files. These changes could be indicative of a breach, malware infection, or insider threat.
  2. Compliance Requirements: Many regulatory standards, such as PCI-DSS, HIPAA, and SOX, require FIM as part of their compliance criteria. It ensures that sensitive data is protected and that the integrity of the system is maintained.
  3. Preventing Data Breaches: By monitoring file changes, FIM can provide early warning signs of a potential data breach. It allows organizations to take proactive measures to prevent unauthorized access to sensitive information.
  4. Enhancing Forensic Analysis: FIM provides detailed logs of file changes, aiding in forensic analysis. It helps in understanding the nature of an attack, the affected files, and the potential impact.

Let’s pause for now and see if common Antivirus/antimalware can take over this compliance requirement without deploying a specific FIM. Why? Because all companies generally have some sort of anti-virus running in their systems and all companies are stingy in their compliance spending, so part of our job is to see if current technology can be sufficient to address compliance requirements. The difference between Anti virus and FIM boils down to the reason of their existence, their meaning to life and everything. Its 42!

While FIM focuses on monitoring the integrity of files, antivirus and antimalware solutions are designed to detect and remove malicious software.

  • Antivirus: Primarily targets known viruses and relies on signature-based detection. It may not detect unauthorized changes to files unless they are associated with a known virus signature.
  • Antimalware: Broader in scope, antimalware solutions target various malicious software, including viruses, spyware, and ransomware. Like antivirus, it may not detect subtle unauthorized file changes.

FIM complements these solutions by providing an additional layer of security, focusing on the integrity of files rather than just malicious content.

FIM also differs from Security Information and Event Management (SIEM) and Security Orchestration, Automation, and Response (SOAR) solutions. That being said, its common that these systems are bundled along with FIM solutions so while it’s possible that SIEM may have FIM, it might not be true that FIM has SIEM. They are like, maybe a dysfunctional family who sometimes get together over Chinese New Year reunions.

  • SIEM: SIEM solutions collect and analyze log data from various sources to provide real-time analysis of security alerts. While SIEM can include FIM as a component, it encompasses a broader range of security monitoring functions.
  • SOAR: SOAR solutions focus on automating and orchestrating security operations. They help in coordinating various security tools and processes. Unlike FIM, which is more focused on file integrity, SOAR aims to streamline security operations and response.

FIM makes its appearance in PCI-DSS v4.0 in requirement 10, specifically 10.2, 10.3,10.4,10.5,10.7 and further on in 11.5, 12.10 and A3.5.1.

In 10.2, PCI basically wants FIM to be part of the logging requirements in terms of what to capture, retention, response and so on. Make sure your FIM is configured to monitor the critical files, and the details of the FIM logs has user and process details, who is responsible for the change event and captured in real time. Ensure alerts are generated for change events by privileged accounts which can be further correlated to create an automated incident. Also, make sure changes to log file security settings or removal of log files triggers real time alerts, with exhaustive event details. All creation and deletion activities are captured as well, and all event details must be as per 10.2.2 for the FIM log files.

10.3.4 makes specific mention of FIM but there is some confusion to this requirement ” File integrity monitoring or change-detection mechanisms is used on audit logs to ensure that existing log data cannot be changed without generating alerts. “. Obviously if you try to monitor for changes in a log file and alert everytime that file is changed, your SIEM or SOAR will light up like Christmas. Because of the nature of log files, it is supposed to change! So to avoid the noise, ensure log files are monitored for changes in security settings, like permissions or ownership. If a log file is deleted, that is also an anomaly. And for those logs that are archived or digitally signed, if any changes are made to these, then your FIM should be able to detect it.

Requirement 11 doesn’t change much for V4.0 — it is the main portion for FIM in 11.5.2 and it remains pretty much the same. Requirement 12.10.5 does provide an explicit requirement to include FIM alerts into incident management and response. But you know that already, right?

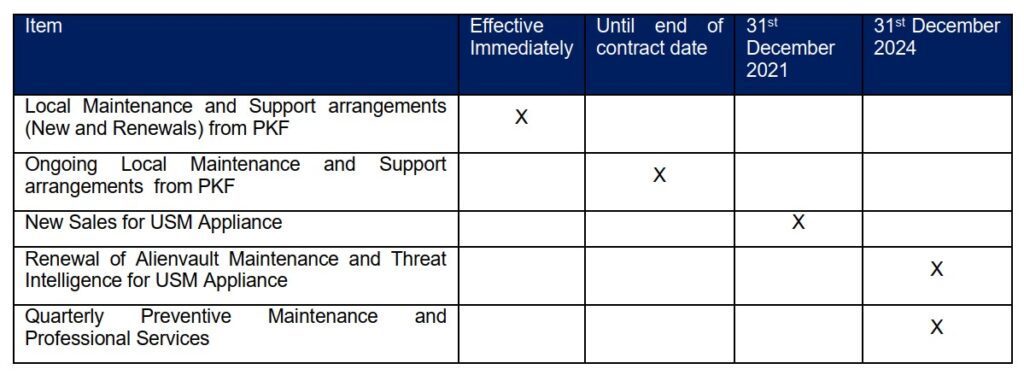
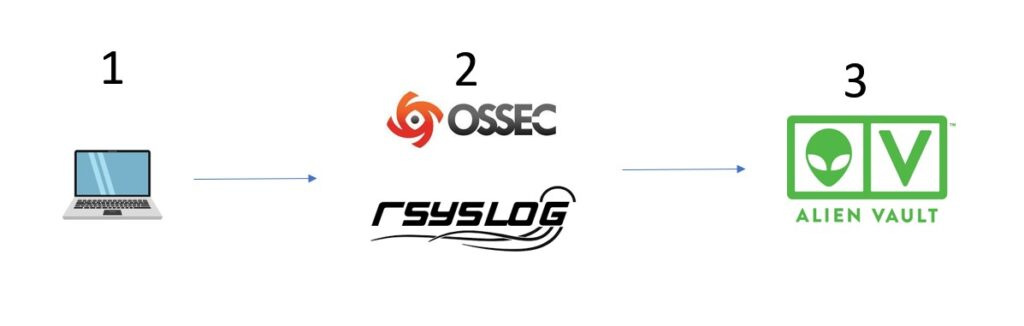
There are plenty of FIM solutions out there. The common ones we see is OSSEC which is deployed together with Alienvault previously. Tripwire is also a well known name in the FIM arena. If you want to explore the inbuilt Linux version of FIM, auditd might be worth your time. For those unfamiliar with auditd, it’s a component that provides auditing functionality for the Linux kernel. It’s widely used for security monitoring, system troubleshooting, and compliance reporting. Configuring auditd might be intimidating to some at first, but here’s some rules to get you started, found in this link

https://github.com/linux-audit/audit-userspace/blob/master/rules/30-pci-dss-v31.rules

In summary, it covers the following areas (config has been omitted in this article, you can go to the site to get the details)

  1. User Access Linking (10.1): Implicitly met by the audit system.
  2. User Access to Cardholder Data (10.2.1): Requires a watch on the database, excluding daemon access. (Path to the database must be specified.)
  3. Logging Administrative Actions (10.2.2): Enable tty logging for su and sudo. Special cases for systemd-run and pkexec are included.
  4. Monitoring Privilege Escalation Configuration (10.2.2): Watches changes to /etc/sudoers and /etc/sudoers.d/.
  5. Access to Audit Trails (10.2.3): Monitors access to /var/log/audit/ and specific audit commands.
  6. Invalid Logical Access Attempts (10.2.4): Naturally met by PAM.
  7. Logging of Identification & Authentication (I&A) Mechanisms (10.2.5.a): Handled by PAM.
  8. Logging of Privilege Elevation (10.2.5.b): Monitors specific syscalls related to privilege elevation.
  9. Logging Account Changes (10.2.5.c): Watches changes to account-related files like /etc/group, /etc/passwd, etc.
  10. Time Data Protection (10.4.2b): Places rules to check time synchronization.
  11. Securing Audit Trails (10.5): Includes various measures to protect audit logs, limit viewing, prevent unauthorized modifications, back up files, and monitor log modifications.

So, there you go. Lastly, though since PCI v4.0 came out, the council seem to have made distinction of change detection mechanisms vs File integrity monitoring, stating that FIM is part of CDM, sort of like a subset. I suppose this gives a little more leeway for companies to implement other types of CDM other than FIM, although FIM is probably the only one that can address all the above requirements comprehensively and without any need for compensating controls. But just for some ideas, the below may be a list of other CDMs that can possibly address the FIM functionalities in part, automated or manual:

  1. Version Control Systems: These systems track changes to files and code within a development environment. They allow developers to see what was changed, who changed it, and why. Tools like Git, Subversion, and Mercurial are examples of version control systems that provide change detection.
  2. Database Monitoring Tools: These tools monitor changes to database schemas, configurations, and content. They can alert administrators to unauthorized alterations, additions, or deletions within the database. Tools like Redgate SQL Monitor or Oracle Audit Vault are examples.
  3. Configuration Management Tools: Configuration management tools like Ansible, Puppet, and Chef can detect changes in system configurations. They ensure that systems are consistently configured according to predefined policies and can alert administrators to unauthorized changes.
  4. Network Anomaly Detection Systems: These systems monitor network behavior and alert to changes that may indicate a security threat. They can detect changes in traffic patterns, unusual login attempts, or alterations to network configurations.
  5. Endpoint Detection and Response (EDR) Solutions: EDR solutions monitor endpoints for signs of malicious activities and changes. They can detect changes in system behavior, file activities, and registry settings, providing a broader view of potential security incidents.
  6. Log Monitoring and Analysis Tools: Tools like Splunk or LogRhythm analyze log files from various sources to detect changes in system behavior, user activities, or security settings. They can provide real-time alerts for suspicious changes.
  7. Digital Signature Verification: Some systems use digital signatures to verify the integrity of files and data. Any alteration to the digitally signed content would cause a verification failure, alerting to a potential unauthorized change.
  8. Cloud Security Tools: With the rise of cloud computing, tools like AWS Config or Azure Security Center provide change detection for cloud resources. They monitor configurations, permissions, and activities within the cloud environment.

Again, we would highly recommend that a FIM be used, but in the case where it is not possible in that environment, for instance Cloud environment, then other CDMs can be possible. If you need to know more about FIM and PCI or any compliance in general, drop us a note at pcidss@pkfmalaysia.com and we will get back to you immediately!

Official Announcement AT&T Cybersecurity on sales hold for Alienvault

As previously announced, USM Appliance will be placed on a new sales hold effective January 1st, 2022.

What does that mean for me?

All net new sales of USM Appliance to new customers will be discontinued. Any new USM Appliance orders placed until December 31st, 2021 will be accepted. Renewals and expansions to existing deployments will continue to be accepted until December 31st, 2023. A sales hold is NOT a declaration of any end of support; AT&T will continue to provide support through December 31st, 2024

How can I continue to support my customers?

AT&T Cybersecurity is committed to providing our customers with innovative security solutions. USM Anywhere, our SaaS-based solution, will continue to be the focus and flagship product for our Threat Detection and Response offerings.

Please take a look at https://cybersecurity.att.com/products/USM-Anywhere for more information on USM Anywhere. If you have any questions, you can reach out to us at alienvault@pkfmalaysia.com.

Alienvault Appliance End of Sales and End of Life

All good things must come to an end.

Over the weekend, AT&T put an official announcement out to all partners what we have been informed weeks earlier, that the Alienvault Appliance has now got an expiry date in terms of its life. Since we picked up Alienvault six years ago, dealing with the small support team out from Spain and sales team from Cork, Ireland, it has been a good ride and we’ve learnt massively a lot through the years. AT&T is steering into a different direction, and Alienvault is moving completely into cloud, putting an end to the ever popular All-in-Ones and Standard Appliance. We will miss the days of writing plugins for our clients.

Anyway, here is our official announcement:

27th September 2021

Alienvault USM Appliance End of Sales (EOS) and End of Life (EOL) Announcement

There has been an official announcement from AT&T to all channel partners dated 25th September 2021, that the Alienvault USM Appliance will be placed on a new sales hold effective January 1, 2022. AT&T will also no longer support the USM Appliance effective January 1, 2025. These dates are effectively the End of Sales (EOS) and End of Life (EOL) dates for the USM Appliance (otherwise known as Alienvault On-Premise). If your solution is an “All-in-One”, “USM Standard” or “USM Enterprise”, these solutions will be the ones affected by this announcement.

As one of the first partners of Alienvault in Malaysia since 2015, we are saddened with the news that the popular USM Appliance solution will no longer be available from 2022 onwards. We therefore require any new sales made (either from us or from our partners) from now till 31st December 2021 to inform the potential customer of the above EOL and EOS dates to ensure that purchases are made with this information clearly stated. This is to avoid any miscommunication of expectations to the end-user. Additionally, we will cease all local maintenance support renewal from the date of this letter. The local maintenance support includes arrangements for 24×7, or 8×5 call or onsite support from PKF directly. We will continue to honour all ongoing contracts until the contract expiry. This is in line with us re-allocating our technical resources and focus to other solutions and initiatives. The annual maintenance support and threat intelligence subscription from AT&T will still be continued until 31st December 2024. PKF will still be continuing our quarterly preventive maintenance or any ad-hoc professional service to assist our clients on USM Appliance matters. In summary, the cease dates are as follows:

As we move our focus away from the USM Appliance in both sales and support, we would recommend a transition plan to be in place. This can include the option to move to USM Anywhere, which is the direct transition to AT&T’s SaaS based SIEM. Please contact us at alienvault@pkfmalaysia.com for further details in moving forward.

Thank you for your support all these years and we hope that we can continue to work together for many years to come.


Alienvault: Working with Decoders and Rules

When we started out with Alienvault years ago, they were just a smallish, start up company and we worked directly almost with the engineers and sales team in Cork. Of course, a lot has changed since AT&T took over, but during the early days, there were a lot of knowledge and mindshare done directly between us and them. So much so that if you were to check their partner site, they still list us as the only Malaysian company as their reseller, due to the early days of listing. What attracted us to the product was that we could lift the hood and see what was underneath. Alienvault (or OSSIM) was previously a hodgepodge of many working parts that were glued together and somehow made to work. The agent was a product called OSSEC, which is an open-source HIDS. The IDS is Suricata/Snort and if you look closely at the availability tool, you would see the backend is a Nagios running. NFSen is used for their netflow data display, and PRADS for their asset discovery. OPENVAS is their vulnerability scanner and best of all, they allow you to jailbreak the system and go into the OS itself and do what you need to do. In fact, most of the time, we are more comfortable on the command line than through the actual UI itself.

The history aside, the downside of adding in these different applications and getting them all to play nice together, is that you would have to understand the interworkings of these pieces.

For instance, if you were to send logs via Syslog to Alienvault, you would have to know that the daemon rsyslog (not an Alienvault product) is the one being used to receive these logs. If you were to use the agent, then the application receiving these logs is different – it’s the OSSEC server that receives it. So it depends how logs come in, and from there you can decide what you wish to do with it.

The challenge is oftentimes to filter and ‘massage’ the logs when it hits Alienvault. There are a few approaches to this:

The basics are at stage 1 where the client (server, workstation etc) send logs (or have logs to be collected) to Alienvault. The initial filtering should theoretically happen here if possible. Many applications have the capability to control their logs – Windows server being one of them. Turning on debug logs on Linux for instance would cause a fair bit of log traffic across the network. Applications as well, have options of what to log and what not to log. We see firewalls logging traffic logs, proxies logging every single connection that goes through – this causes loads of logs hitting the Alienvault.

AV (especially the All In Ones) isn’t designed to take on heavy loads the way Splunk or other enterprise SIEM like ArcSight, that chews through 100,000 EPS like Galactus chews through planets. The AV approach has always been, we aren’t a SIEM only, we are a unified security management system, so security logs are what we are after. Correlation is what we are after. APT are what we are after. Their philosophy isn’t to overload and do generic Business Intelligence with millions of log lines, but to focus on Security and what is happening to your network. That being said, it’s no pushover as well, being able to work with 90 – 120 million events and going through 15,000 EPS on their enterprise.

The reality however is that most clients just turn on logs at Item 1 and plow these logs over to Alienvault. So it’s really up to Alienvault to start filtering these logs and stopping them coming in. At layer 2, is what we call the outer layer. This is the front line defence against these attacks of logs. These are where the engine running these log systems (OSSEC, rsyslog etc) can filter out and then trickle what is needed to Alienvault main engine itself in Layer 3. The AV main engine also has its form of defence, in policies, where we can create ‘junk’ policies to simply ignore logs coming in and not process them through the resource intensive risk assessment calculations.

So, we are going to assume that Layer 1 filtering wasn’t done. What we are going to look at is sorting out Layer 2 and we will assume that logs are coming in via OSSEC. We will have another article on Rsyslog filtering because that is a whole different novel to write.

When it hits OSSEC, it’s going via default port 1514/udp. Now remember, when logs first enters Alienvault, it doesn’t immediately go into the SIEM event display. It first needs to be logged, before it can be turned into events, before it can trigger alarms. So the basic rule is to get it logged:

Make sure you are receiving logs first.

This may seem juvenile in terms of understanding but we have been through enough to know that no matter WHAT the client says, oftentimes, their systems are not even sending the logs to us! A simple tcpdump -Xni eth0 “udp port 1514” will see if the logs are getting in, so go ahead with that first to ensure you are receiving. Just add a “and host <ip address>” if you need to filter it by the IP address.

Another way that Alienvault allows, when you are getting logs via HIDS/OSSEC is by enabling the “logall” on USM HIDS configuration, which we covered in the previous articles here. But be aware turning on logall potentially will bring a lot of logs and information into the box so we generally avoid this unless it’s really needed.

Once you are seeing logs coming into Alienvault, for OSSEC at least the next thing to do is to move these logs to “alerts.log” and from there, Alienvault can start putting it into the SIEM display.

For this to happen, you need to understand 3 things here, aside from the fact that we are currently now working on layer 2 from the diagram above – OSSEC:

a) Decoders

b) Rules

c) /var/ossec/bin/ossec-logtest

The above are actually OSSEC terminologies – not strictly Alienvault. What this means is that if you were to decouple OSSEC from Alienvault, you can. You can just download OSSEC. Or you could download other products like Wazuh, which is also another product we carry. Wazuh runs OSSEC (its own flavor) but has a different presentation layer (Layer 3 in our diagram above) and integrates with ELK to provide a more enterprise ready product but the foundation came from the same OSSEC principles. So when we talk about Rules and Decoders and using the ossec-logtest script to test your stuff, it’s not an Alienvault specific talk. Alienvault specific talk we can go later with plugins and stuff. In the actual ACSE course from Alienvault (at least the one I passed 5 years ago), there is really no mention on decoders and rules – it basically just focus on the core Alienvault items only.

At this point, we need to make the decision on whether to have the filtering done on OSSEC level (2) or on Alienvault level (3)? As a rule, the closer the filtering is done to source, the better…however, in our opinion, the filtering by Alienvault plugins is a lot more flexible and intuitive in design, compared to OSSEC (and because we are biasedly trained in Alienvault, but not so much in OSSEC). So for this article (which is taking VERY long in getting to its point), we are tasked to simply funnel the logs into /var/ossec/logs/alerts/alerts.log because that is where OSSEC sends its logs to and where we can get our AV plugins to read from.

The logs in /var/ossec/logs/archives/archives.log (remember, we turned on the logall option in the OSSEC configuration for this illustration) aren’t monitored by plugins. Because in a production environment, you won’t have that turned on. So, once you have logs into the alerts.log file, you are good to go, because then you can sit down and write plugins for Alienvault to use in the SIEM display.

OK – Firstly Decoders. OSSEC has a bunch of default decoders (like plugins in Alienvault) that is able to interpret a whole bunch of logs coming in. Basically, the decoder is set up with Regular expression to go through a particular file and just grab the information from the file and drop it into fields like IP address, date, source IPs etc. Similar to the AV plugin, but for this illustration, we are not going to use much of the OSSEC filtering, but simply to ensure we select the right logs and send them over to the alerts.log file.

So ok, let’s take the previous article example of having MySQL logs into Alienvault. Let’s say we have this example query log coming into our Alienvault (archive.log, if we turned it on)

2021 Feb 21 00:46:05 (Host-192-168-1-62) 192.168.1.62->\MySQLLOG/db.log 2021-02-22T09:41:42.271529Z        28 Query     SHOW CREATE TABLE db.persons

So the above doesn’t really offer much, but you can technically see there is the date and time, and the command line etc and a decoder will need to be created to parse the incoming log.

Picking up from where we left off at the Alienvault link, Task 4 covers the steps to create the decoder:

a) Edit /var/ossec/alienvault/decoders/local_decoder.xml and add in the following:

<decoder name="mysql-query">
        <prematch> Query</prematch>
</decoder>
<decoder name="mysql-connect">
        <prematch> Connect\s*</prematch>
</decoder>
<decoder name="mysql-quit">
        <prematch> Quit</prematch>
</decoder>

The above is simplistic decoder to catch the 3 important events from the logs coming in from MySQL – Query log, i.e

2021-02-22T09:41:42.271529Z        28 Query     SHOW CREATE TABLE db.persons

Connect Log

2021-02-20T16:35:28.019734Z        8 Connect   root@localhost on  using SSL/TLS

Quit

2021-02-20T18:29:35.626687Z       13 Quit  

Now of course, for those aware, the Query logs have many different types of query – Query Use, Query Show, Query Select, Query Set, Query Insert, Query Update and so on. The idea of the decoder is simply to catch all the queries, and we will theoretically log all Queries into Alienvault.

Now, remember to tell Alienvault you have a new decoder file

In the USM Appliance web UI, go to Environment > Detection > HIDS > Config > Configuration.

Add <decoder>alienvault/decoders/local_decoder.xml</decoder> after <decoder> :

Adding the "local_decoder.xmll" setting to ossec_config

Adding this setting enables the usage of a custom decoder. Save it and restart HIDS.

So that’s it for the decoder.

Now, on the CLI, go to /var/ossec/bin and run ./ossec-logtest

Paste the following “2021-02-20T18:29:43.189931Z 15 Query SET NAMES utf8mb4”

And you should the get result as below

linux:/var/ossec/bin# ./ossec-logtest
2021/03/29 09:50:10 ossec-testrule: INFO: Reading decoder file alienvault/decoders/decoder.xml.
2021/03/29 09:50:10 ossec-testrule: INFO: Reading decoder file alienvault/decoders/local_decoder.xml.
2021/03/29 09:50:10 ossec-testrule: INFO: Started (pid: 25070).
ossec-testrule: Type one log per line.
2021-02-20T18:29:43.189931Z 15 Query SET NAMES utf8mb4
**Phase 1: Completed pre-decoding.
full event: '2021-02-20T18:29:43.189931Z 15 Query SET NAMES utf8mb4'
hostname: 'linux'
program_name: '(null)'
log: '2021-02-20T18:29:43.189931Z 15 Query SET NAMES utf8mb4'
**Phase 2: Completed decoding.
decoder: 'mysql-query'

So basically, any logs that come into archive.log that has that sample line “Query” you will be lumping it in as mysql-query decoded. Of course you can further refine it with Regular expression to get the exact term you wish, but for the illustration, we want to catch the queries here and it’s fine for now.

The next item is the rules. Again, referring to the Alienvault writeup above, go ahead and edit
/var/ossec/alienvault/rules/local_rules.xml.

What we will do is to add the following in

<group name="mysql-connect">
<rule id="192000" level="0">
<decoded_as>mysql-connect</decoded_as>
<description>Connect log is enabled</description>
</rule>

<rule id="192001" level="1">
<if_sid>192000</if_sid>
<regex>Connect\s*</regex>
<description>Connection is found</description>
</rule>
</group>


<group name="mysql-query">
<rule id="195000" level="0">
<decoded_as>mysql-query</decoded_as>
<description>Mysql Query log is enabled!</description>
</rule>


<rule id="195001" level="0">
<if_sid>195000</if_sid>
<match>SET</match>
<description>Query set is found and ignored!</description>
</rule>


<rule id="195002" level="1">
<if_sid>195000</if_sid>
<regex>Query\s*</regex>
<description>Query is found</description>
</rule>
</group>


<group name="mysql-quit">
<rule id="194000" level="0">
<decoded_as>mysql-quit</decoded_as>
<description> Quit log is enabled</description>
</rule>

<rule id="194001" level="1">
<if_sid>194000</if_sid>
<regex>Quit\s*</regex>
<description>Quit command is found</description>
</rule>
</group>

So what the above does is to decide what to do with 3 types of MySQL logs you are getting: Connect, Query and Quit. We want to dump these logs into alerts.log so that we can work on it with Alienvault’s plugin. We don’t want to do any fancy stuff here so it’s pretty straightforward.

Each of these 3 have a foundation rule

a) Connect – 192000

b) Quit – 194000

c) Query – 195000

Each rule has a nested rule to decide what to do with it. Notice you can actually do Regex or Match on the rules which really provides a lot of flexibility in filtering. In fact, if it wasn’t for Alienvault’s plugins, OSSEC’s filtering would probably be sufficient for most of your custom logs requirement.

For this illustration, our job is simple – for each of these rules, find out the key word in the log, and then escalate it to an alert. An alert is created when you create a rule ID with level = 1, i.e <rule id=”195002″ level=”1″>

If you run ossec-logtest again, and paste the log there, you would be able to see

**Phase 1: Completed pre-decoding.
full event: '2021 Feb 21 00:46:46 (Host-192-168-1-62) 192.168.1.62->\MySQLLOG/db.log 2021-02-22T09:42:21.711131Z 28 Quit'
hostname: '(Host-192-168-1-62)'
program_name: '(null)'
log: '192.168.1.62->\MySQLLOG/db.log 2021-02-22T09:42:21.711131Z 28 Quit'
**Phase 2: Completed decoding.
decoder: 'mysql-quit'
**Phase 3: Completed filtering (rules).
Rule id: '194001'
Level: '1'
Description: 'Quit command is found'
**Alert to be generated.

Once you see “alert to be generated” you will find that same alert in the /var/ossec/logs/alerts/alerts.log

AV - Alert - "1613881201" --> RID: "197011"; RL: "1"; RG: "connect"; RC: "Quit Command found"; USER: "None"; SRCIP: "None"; HOSTNAME: "(Host-192-168-1-62) 192.168.1.62->\MySQLLOG/db.log"; LOCATION: "(Host-192-168-1-62) 192.168.1.62->\MySQLLOG/db.log"; EVENT: "[INIT] 2021-02-22T09:42:21.711131Z        28 Quit       [END]";

From there, you can go about doing the plugins and getting it into the SIEM.

Whew. That’s it.

You would notice, however, there is another sub-rules in there for Query:

<rule id="195001" level="0">
<if_sid>195000</if_sid>
<match>SET</match>
<description>Query set is found and ignored!</description>
</rule>

This is set above the “alert” rule and you notice that this is Level=0. This means whatever Query that is decoded, first runs this rule and basically if I see there is a Query “SET”, I am going to ignore it. I.e it’s not a log I want and I am not going to put it into the alerts.log. Level 0 means, not to alert.

I am ignoring Query Set because in this case, we are finding millions of query set as it is invoked a lot of times and mostly it is false positives. I am interested in Query Selects, Inserts and Updates etc.

Once you have this rule put in, it will filter out all Query Sets. This is basically the only filtering we are doing so we don’t have those millions of Query Sets jamming up my alerts.log file in Alienvault.

alienvault:/var/ossec/logs/archives# ossec-logtest
2021/03/14 12:36:33 ossec-testrule: INFO: Reading decoder file alienvault/decoders/decoder.xml.
2021/03/14 12:36:33 ossec-testrule: INFO: Reading decoder file alienvault/decoders/local_decoder.xml.
2021/03/14 12:36:33 ossec-testrule: INFO: Started (pid: 12550).
ossec-testrule: Type one log per line.
192.168.1.62->\MySQLLOG/db.log 2021-03-14T16:22:58.573134Z 19 Query SET NAMES utf8mb4'
**Phase 1: Completed pre-decoding.
full event: '192.168.1.62->\MySQLLOG/db.log 2021-03-14T16:22:58.573134Z 19 Query SET NAMES utf8mb4''
hostname: 'alienvault'
program_name: '(null)'
log: '192.168.1.62->\MySQLLOG/db.log 2021-03-14T16:22:58.573134Z 19 Query SET NAMES utf8mb4''
**Phase 2: Completed decoding.
decoder: 'mysql-query'
**Phase 3: Completed filtering (rules).
Rule id: '195001'
Level: '0'
Description: 'Query set is found and ignored!'

So you see, from the above, all Query Sets are ignored. You can basically do whatever you wish by using either Regex or Match and ignore certain log messages from OSSEC itself. It’s very powerful and flexible and with enough time and effort, you can really filter out only the needed logs you want into Alienvault, which is really part of the fine-tuning process for SIEM.

So there you have it. What you have done now is to take those logs from archives.log and make sure you only put the logs you want in alerts.log (Quit, Connect, All Query except for Query Set).

The next thing you need to do is to go down to Alienvault (layer 3) and do the heavy lifting in writing plugins and get these events into the SIEM display.

For more information for Alienvault and how it can help your compliance, send us an email at alienvault@pkfmalaysia.com and we will get back to you ASAP!

Alienvault: File Integrity Monitoring on Linux Part 1

If you have been deploying or troubleshooting Alienvault long enough, you would know a few things: Alienvault is one of the most flexible SIEMs in the market. It has the most varied security features, and covers almost the entire spectrum of our PCI-DSS needs – from IDS, to SIEM, to File Integrity Monitoring, to vulnerability scaring to a partridge in a pear tree.

One of the products working under the Alienvault hood is OSSEC, which is a opensorce host based IDS. Sometimes, its interchangeable to HIDS, which is Host IDS, but really, the latter is simply the type; while the former is the actual name itself. For the sake of this article, we will interchange both terms.

OSSEC runs well with Windows, where Alienvault can do an auto deployment given the correct setup and credentials. However, it’s on Linux boxes that sometimes we get a bit concerned. Not because the product doesn’t work, but simply because the setting up of the installation. There is no auto deployment, so we need to set it up manually, and this might mean downloading the correct packages in the first place.

After this, we are going to look at a specific function of HIDS – File Integrity Monitoring or FIM for short.

Firstly, let’s get started. We have set up a simple CentOS 7 box in our lab in the same network as Alienvault, and we are going to install HIDS on this box as an AGENT. This will then talk to the Alienvault USM which is the server.

So let’s assume you have your agent system network setup (please ensure your DNS is set properly, you should be able to work this out in CentOS 7 either through the network tools or editing resolv.conf).

 yum groupinstall "Development Tools" -y

The CentOS development tools are very useful tools which is a bundle, used primarily for building and compiling software from source code. “Yum” here while making you think of going for a teh tarik is a command found in almost all red-hat based distros to run installations. It’s used for update, installations etc. In the old days before YUM, we would use RPM (which is really what YUM is using), but we would have to manually track down dependencies and it really sucks because to install an RPM package might mean to install a whole bunch of stupid libraries or updating stuff and you are basically running around the internet looking for RPMs like Where’s Wally. It looks awful now, but back in the days, RPM was heavensent. We didn’t need to do “tar”, configure, make, “make install” anymore!

Anyway, the -y argument behind simply automates the command by answering yes to the prompts. So once you run that, fingers crossed, everything runs ok and you get

Complete!

Which means everything is ok.

The next is to get the kernel-devel package.

yum install kernel-devel -y

This is a package that allows us to install a kernel driver later. It’s not the full kernel source, so it shouldn’t take too long before you see the “complete!”.

At this point you are ready to install OSSEC. If there are any issues, then troubleshooting is obviously required.

First, we need to locate the version of HIDS that can work with Alienvault. You might think heading to the latest HIDS in https://ossec.github.io/downloads.html might be the answer, but for Alienvault, we would recommend to get the 2.8.3 version. You can find it here:

https://bintray.com/ossec/ossec-hids/download_file?file_path=ossec-hids-2.8.3.tar.gz

So, go to a installation directory (optional) like /usr/src and run

curl -OL https://bintray.com/ossec/ossec-hids/download_file?file_path=ossec-hids-2.8.3.tar.gz

We used curl here because for some reason wget wasn’t installed. the -OL is supposed to handle the redirected links for that particular site and supposedly to rename it to a proper remote file name. It doesn’t do the rename though (don’t know?) and we wind up with a file called “download_file?file_path=ossec-hids-2.8.3.tar.gz”. Just rename it if you are into aesthetics to ossec-hids-2.8.3.tar.gz.

So now lets do an extraction

tar –xzvf ossec-hids-2.8.3.tar.gz

We now have a folder called ossec-hids-2.8.3. Go into this folder and then run

./install.sh

Once you run, you will be given a series of questions. Default should be fine for most, and you should just select ‘agent’ and also key in the server (Alienvault) IP address. Now if you are running a separate Alienvault setup (non-AIO), then this IP address is actually the address of your SENSOR. Not Alienvault Server. So don’t get mixed up. The Sensor is the Server. Hm.

So everything ready, fingers crossed, just go ahead and install. There will be a lot of text filling your screen but the important thing is that there is no ERROR or WARNING (well warning ain’t bad), but at the end you should have a welcome note stating

 Thanks for using the OSSEC HIDS.
 If you have any question, suggestion or if you find any bug, contact us 
at contact@ossec.net or using our public maillist at ossec-list@ossec.net 
(http://www.ossec.net/main/support/ ).

Press enter and you should be out of the installation. Congratulations!

You are not done yet. You still need to get Alienvault to talk to your box. The steps are as follows:

a) Generate an Agent Key from Alienvault

Go to your Alienvault AIO or your Server (since a standard sensor has no GUI, remember?).

Environment->Detection->Agents

Click “Add Agent”

Select the host from the list (It should be there automatically, but if it’s not just add it there through the asset list).

So now the agent has been created but you should see it as “Disconnected” from the list. Click the little Key sign that says “Extract Key”.

You should see something like

Agent key information for '2' is:

MiBIb3N0LTE5Mi0xNjgtMC01MCAxOTIuMTY4LjAuNTAgMDBmYzI0MzUyNzg4N.....etc
The garbled message is the key. So go ahead and highlight and copy it.

b) Import the key into the agent system

Go back to your agent system and head over to /var/ossec/bin and run

./manage-agents

Type in ‘I’ to import

Paste the whole key into the screen and confirm adding it.

Quit and then restart by going

/var/ossec/bin

And

./ossec-control restart

c) Restarting HIDS on the server

On the server head over to

Environment->Detection->HIDS Control

On the right side, click “Restart” the HIDS and you should be fine.

d) Check the Agent Logs

Head back to the agent system and check the logs

cd /var/ossec/logs
more ossec.log

You should (hopefully!) see

INFO: Connected to the server (192.168.0.xxx:1514).

where xxx is your server IP address.

Back in the USM server you will be able to see that now the agent is “Active”.

In the next article we will see if we can get the FIM to work.

« Older posts

© 2024 PKF AvantEdge

Up ↑